Raw milk, also known as unpasteurized milk, may contain harmful bacteria such as E. coli, salmonella, and listeria, which may lead to foodborne illness – especially severe in young children, older adults, and people with compromised immune systems. Consuming unpasteurized milk could result in nausea, vomiting, and diarrhea, which in extreme cases could even prove fatal.
Pasteurization offers many advantages to milk production. By heating it to kill harmful bacteria and reduce spoilage organisms, pasteurization ensures fresh milk stays fresh for longer.
We can now enjoy all of its nutritional benefits without the risk of bacterial infections!

Step-by-step guide to milk pasteurization
Pasteurization refers to heating milk to at least 145 degrees Fahrenheit (63 degrees Celsius) for 30 minutes or 161 degrees Fahrenheit (72 degrees Celsius) for 15 seconds via the high-temperature short-time (HTST) process in order to destroy pathogenic bacteria that can lead to illness without altering its nutritional properties significantly.

Step 1: Gather Supplies
Before initiating the pasteurization process, ensure you have all the essential equipment. For this step, you will require:
- Large pot or double boiler
- Cooking thermometer and timer
- Ice cold water in a large bowl or sink
- Clean glass jar or container with a lid to store the milk
Preparing Your Work Area
Make sure your workspace is free from contaminants by sanitizing all countertops and thoroughly washing all equipment to eliminate bacteria during the pasteurization process. This will help ensure an uninterrupted pasteurization process and high yield results.
Assure Quality of Milk
To ensure quality milk, ensure it comes from a reputable source and the animals are healthy and treated humanely. Raw milk quality directly impacts how its pasteurization process will proceed.
Step 2: Prep Pot and Milk
Fill your pot or double boiler with enough water so that a consistent and even water bath exists for pasteurizing milk properly. It is crucial that enough water reaches the boil point in order for proper pasteurization.
Preparing the Milk Container
While you wait for the water to heat up, pour your fresh milk into a clean glass jar or container. Allow some space at the top so it can expand when heated; using only clean containers prevents potential contamination issues.
Avoid Cross-Contamination
It is critical that no raw milk comes into contact with foods or surfaces not meant for pasteurization, in order to prevent cross-contamination of bacteria and potentially endangering the safety of your kitchen.
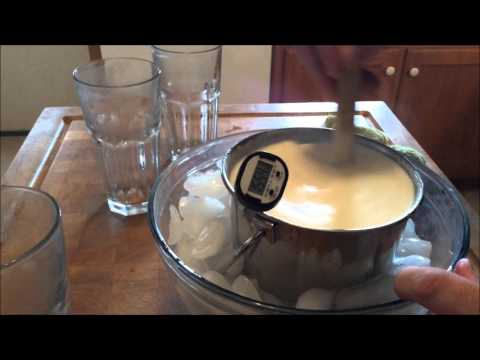
Step 3: Placing Jar in Water Bath
Once the water has reached a boil, turn off the heat and place a jar of milk into your pot or double boiler with enough water to reach up to the level of milk inside its container. This ensures even heating for maximum results.
Monitoring Water Temperature
To maintain an ideal water bath temperature, add additional water as necessary and regularly check its temperature to make sure that it remains constant during this process.
Securing the Jar
Make sure that the jar is secure in its water bath by using a canning rack or similar tool to ensure its stability, to prevent spillage or burns or injuries to anyone nearby. This step is vitally important and must not be ignored!
Step 4: Warming Milk and Maintaining Temperature
Monitoring the milk with a cooking thermometer, observe its temperature while it is immersed in its water bath. When reaching 145 degrees Fahrenheit (63 degrees Celsius), set your timer for 30 minutes.
Consistent Heat Application
Applying consistent heat during pasteurization is crucial. If using a stove, make adjustments as necessary in order to maintain an appropriate temperature; sudden temperature shifts could negatively impact milk quality.
Accurate Temperature Measurement
Precise temperature measurement is integral to successful pasteurization. If milk fails to reach the correct temperature, harmful bacteria may not be eradicated, and overheating could alter its quality and nutritional value significantly.
Step 5: Maintain the Temperature
Over the next 30 minutes, it is vitally important that the milk stays at an ideal temperature. To do so, periodically add cold and/or ice water as necessary until its temperature reaches approximately 145 degrees Fahrenheit (63 degrees Celsius).
Frequent Temperature Checks
Regular checks with your cooking thermometer should help to ensure that milk remains at an ideal temperature, and any necessary adjustments should be made immediately if its temperature strays from its target range.
Avoid Overheating
Care must be taken not to overheat milk, as this will denature proteins and ruin its flavor. If its temperature exceeds your target range, remove some of the hot water from your bath and add cold water instead. This should bring down its temperature quickly.
Step 6: Removing the Jar from the Water Bath
After 30 minutes have elapsed, carefully remove your jar from the water bath using tongs or oven mitts and do so carefully to avoid spills or burns.
Establish Rapid Cooling
Place the jar in a large bowl or sink filled with cold water and ice, which will quickly help cool down the milk, stopping its heating process and stopping bacteria growth. This step is important in order to prevent further cooking or spreading.
Maintain an Even Cooling
Stir the milk regularly to ensure it cools evenly. Uneven cooling could lead to pockets of milk remaining warm longer, providing bacteria an opportunity to thrive and survive.
Step 7: Confirming Milk Is Cooled (Optional)
Once the milk has settled down, use a cooking thermometer to check its temperature. It should have reached 40 degrees Fahrenheit (4 degrees Celsius). If necessary, add cold water or ice cubes into your bowl or sink and continue cooling it further.
Importance of Proper Cooling
Proper cooling is vital to stopping pasteurization processes and ensuring milk is safe for storage. Without sufficient cooling, milk could spoil quickly, creating health risks that should not be ignored.
Storage of Cooled Milk
If necessary, temporarily store cooled milk in an ice bath until you’re ready to transfer it into your refrigerator. Be sure that its container remains sealed in order to avoid contamination of its contents.
Step 8: Storing Pasteurized Milk
Refrigerating Milk
Once the milk has reached the ideal temperature, store it in an airtight container in the refrigerator. For best results, place it away from direct sunlight or frequent temperature fluctuations, such as near the door. It should remain at this temperature for one week.
How to pasteurize milk video
Labeling the Milk
Label your container with the date of pasteurization. This will help you keep track of the milk’s freshness and ensure that it is consumed within the appropriate time frame.
Avoiding Contamination During Storage
Be mindful of where you place the milk in the refrigerator. Keep it away from raw meat and other potential sources of contamination. Additionally, always use a clean utensil when serving the milk to maintain its purity.
Additional Tips
Maintaining Cleanliness
To avoid contamination, make sure all equipment and surfaces are clean and sanitized before beginning the pasteurization process. The cleanliness of your equipment is as important as the process itself for ensuring the safety of your milk.
Monitoring the Process
Do not leave the milk unattended during the heating process. Constant supervision will allow you to make the necessary adjustments to temperature and ensure that the milk is pasteurized correctly.
Avoiding Microwave Pasteurization
Do not use a microwave to pasteurize milk, as it can heat the milk unevenly and may not kill all harmful bacteria. Microwaves are not recommended for this delicate process due to their inconsistent heating patterns.
Using Alternative Temperature Tests
If you do not have a cooking thermometer, you can use the “finger test” to determine the temperature of the milk. Dip your finger into the milk and count to 10. If you can comfortably hold your finger in the milk for 10 seconds, it is at the correct temperature. However, this method is not as reliable as using a thermometer.
Expecting Taste and Texture Changes
Pasteurized milk may have a slightly different taste and texture compared to raw milk. This is normal and does not affect the safety or quality of the milk.
Conclusion
Pasteurizing milk at home is a simple and important process to ensure the safety of the milk we consume. By following these steps, you can pasteurize goat milk, cow milk, or even your own breast milk at home. Remember to always use caution and proper sanitation when handling milk to avoid contamination. Cheers to safe and delicious milk!


